
This is the second post of Accessible PDFs series of blogs. You can view the first post from Accessible PDFs – Creating a PDF (1/5).
These posts are inspired by these three very useful articles:
- PDF Accessibility Repair: Examine and Repair Tables
- PDF – the Print Devli’s Format?
- PDF Accessibility
In this post I am looking at the document structure which you can look at using the Accessibility pane. According to Adobe Acrobat feature comparison, accessibility features are available in Acrobat XI Pro, Acrobat Pro 2017 and Acrobat Pro DC.
Add Accessibility Panel
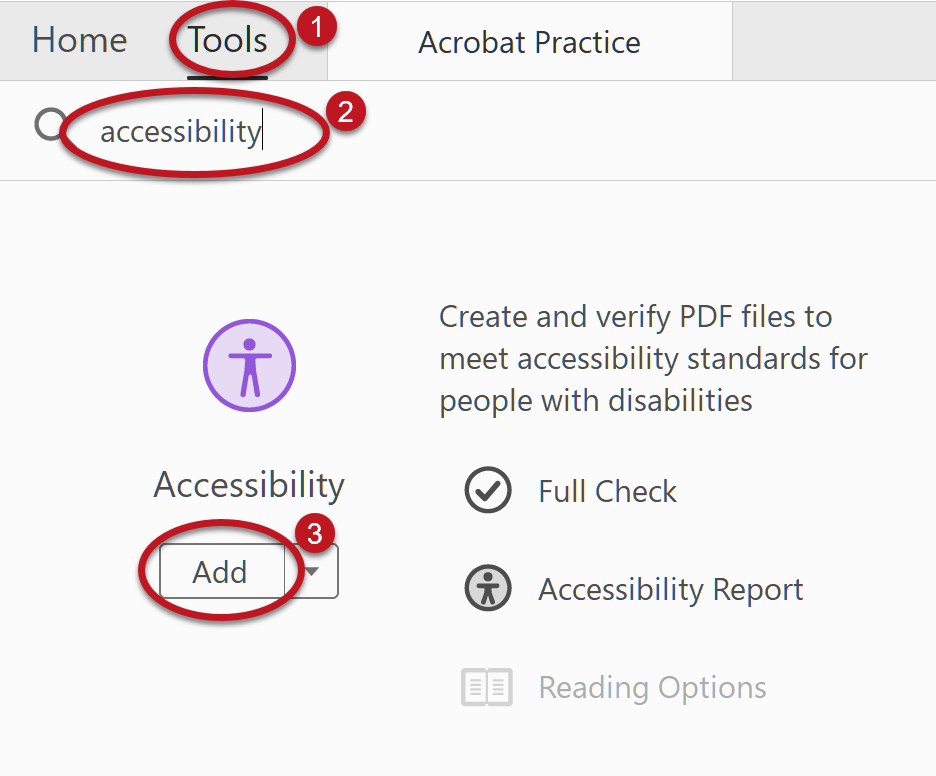
If you have never used this feature you will have to add Accessibility tool by going to Tools > Accessibility > Add. Because I have already added this in my computer I am using WebAIM guide’s image here.
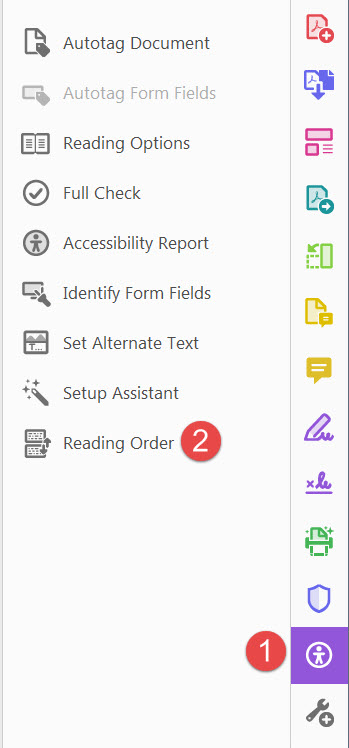
Once this is added you will be able to select the Accessibility pane from right-hand side bar. Select Reading Order from the Accessibility pane.
Document Structure
It is best to get the structure of the document corrected before worrying about its reading order. To with the document structure, select Structure types on Reading Order dialog to make sure each content type is correctly identified. If something is not correctly tagged you can fix it here.

You can draw a box around the content you want inside the tag (you can draw the box a bit larger around the content for this) to select the content. Alternatively if there is already a box around it, clicking on the tag on top-left corner of the box to change the tag. When the content is selected the greyed out part of the Figure 3 (various content elements, H1, H2…, Paragraph, Figure, Table etc) will be activated so that you can select appropriate content type.
Notice that despite using Word to create a table, table cells are labeled as paragraphs (P) rather than Cells (TD – table data cell or TH – table header cell). So how can you correct these in a document?
Tables
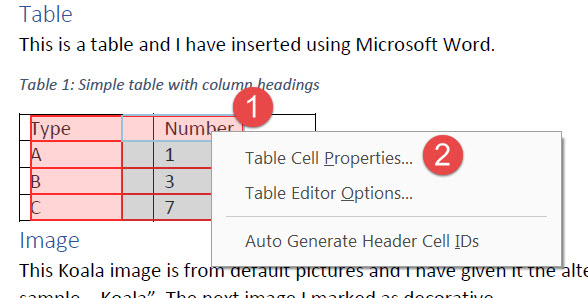
If you have tables make sure to mark table headers appropriately. For this select the table and go to Table Editor.

As soon as you select table editor you will be able to see the table outline highlighted. The colours can be changed using Table Editor Options but I am not going to talk much about that because I want to concentrate on document structure.

Now select the cell and right-click. Select Table Cell Properties.
Now in Table Cell Properties dialog select correct cell Type (Header Cell or Data Cell). If it is a Header cell, select the scope of the header cell. Assign attributes as required. If you have a complex table with multiple header rows/columns cell IDs are needed. I am not discussing it here but you can head to PDF Accessibility Repair: Examine and Repair Tables for more details.

Because my table has a column header I selected Column under Scope. After correctly assigning correct type to my table cells it looks as Figure 7.

If you select Table Editor Options… after right clicking the table in editor mode (Figure 8) and select Show cell type (TH or TD) under Label Option in the Table Editor Options dialog (Figure 9).


Now you should be able to see all the changes you have made to the table.

You can correct the page structure this way.
I tried document structure with a more complex table where there were merged cells etc. I think it is best to stick to simple tables. I will be writing another blog about making complex tables accessible.
No Tags
Left corner of each box will show what content type being identified. If you cannot see any boxes showing content encased in them it is likely that the PDF is not tagged.
In the next post I will look at the reading order.

I am a Learning Technology Researcher and the Chair of the Online Learning Research Centre at the University College of Estate Management. My principle research interests lie in the area of social implications of information and communication technologies, especially eLearning.